Showing posts with label tutorial. Show all posts

Tuesday, September 4, 2012

Photoshop Actions

I found an old email that I sent to myself with some photoshop actions. I downloaded a few and tried them out.  In the past I've used Actions from Pioneer Woman. These are from some random site that shows you 40 vintage + retro actions. About half of them no longer work.  One of them linked to another site with a ton.  Actions are cool because you just click once and you get some effect.  Sometimes it's not the effect you want so you just undo that and click another button. It is still easier than trying to figure something out on your own.  So far I have liked Pioneer Woman's the best because she has all the actions grouped and she names them better than "Action 1" and "Action 2."

I think the HDR one looks cool in a this picture looks fake kind of way.

The top left photo is the original and it was taken on September 2.

Friday, August 17, 2012

How I Document My Runs

I run wearing my Garmin watch if at all possible. I upload to the standard connect.garmin.com site.
I view my data on the site and click on "Splits" in the upper right corner. 

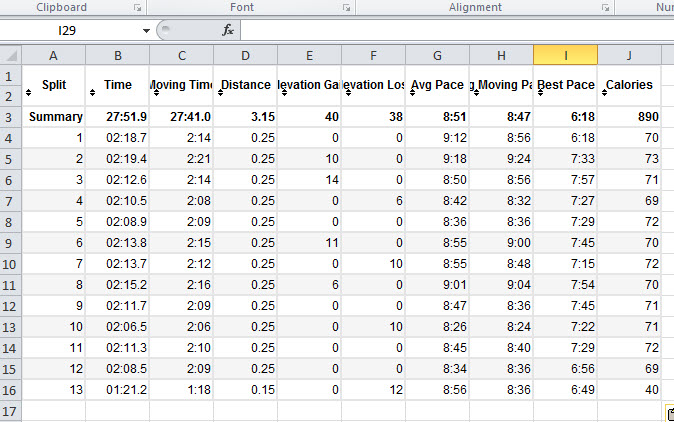
I then copy and paste that into a new tab in excel. I have a file for each year and a tab for each date.  I also have a few summary pages too.
Once I copy the data in, I run an excel macro that I recently created. I made a video of myself completing the macro. I should look into a way to record what my screen is doing. It is all very quick.  Once I run the macro I have the summary columns on the right and the detailed summary below the data.
I am not the best at macros so I still have to do a few things manually. I manually have to update A25 and A26. The macro doesn't know what type of run it was or the weather.  In addition to that if the last line of data from the Garmin has less than a minute, I have to go manually add a 0 before the number.  It will say ":56" instead of "0:56" so then it doesn't register. I will figure out how to have the macro do this but right now I do not.  I also have a few macros based on the mileage but I will have the macro figure that out too.  If it is between 3 and 4 miles, I run a different macro than between 4 and 5 miles. I also have to confirm that the best split does not take into account the last split that is less than .25.

I  then highlight the summary table and print it to Snagit. I crop it down and save it for my blog posts.
I used to save as html but I didn't like that as much because I couldn't put it to the right or left of text that way.
This is what the macro looks like that I used above.  I copy and pasted data from another tab and recorded the macro. Then I went in to update the macro so it would always paste to the current sheet. I also added the end statements to make the 3.15 mi cell update to the actual portion of the mile I completed.  I might not have done it the best way, but it gets the job done.   (You can hit Alt + F11 to view the macro you have. You can also hit Alt + F8 to run a macro.)

In my main summary tab, I document the date, time, distance, who I ran with, type of run, description and location.  I also have target pace and distance but don't always have those filled out.    The file creates mile pace and projected finish at current pace for a bunch of different long races.

I have another tab that has the weekly mileage totals. I also have 2010 and 2011 off to the right of my 2012 data for some quick comparisons.

I have a monthly mileage totals tab too.  I also have my Goals for each month too.  I have 2011 monthly totals on this sheet as well.

I also have a tab comparing marathon training at different times so I can compare week 10 to week 10 in training to see how that goes.  I also have off to the far right my half marathon training in 2010.  I ran more for the half than I did for a marathon. I'm the worst at training.

How do you keep track of your running miles?  Do you even keep track?

Sunday, August 5, 2012

Photoshop

So I randomly found a Photoshop tutorial on youtube. I gave it a shot with a picture that was showing up in my picasa at the time. I probably should have gone through at least a few pictures to find the best one but oh well. It's from May 3.
Here's the before and after.  This is what I'd look like without huge bags under my eyes I guess.   I want to do it again and pick a picture where I have more eye make-up on and see how that one looks.

It probably took me 30 minutes and I was constantly pausing her video.
I think I look too fake without all my lines but it was still fun to do. I didn't even take them all out.  The after pictures look more like me in 2005.
But then again here's a picture from March 18, 2012 and I don't seem to have all the bags under my eyes. (I didn't edit this photo at all.) And it is a coincidence I'm wearing the same shirt.

Wednesday, November 17, 2010

Top Knot

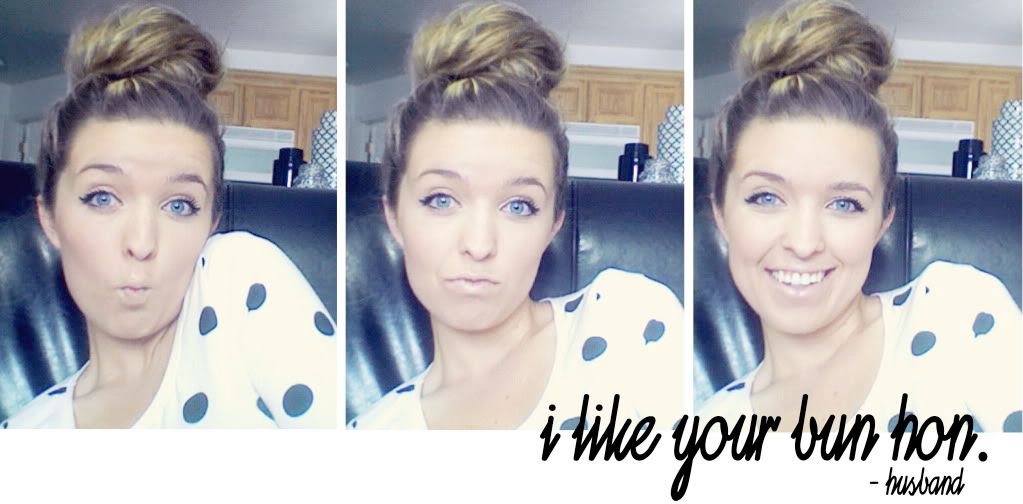
I did a Top Knot today based on Sydney's tutorial. (well she calls it a bun but prior to her calling it a bun I called it a top knot so that's what I'm still calling it)

Some notes:
I teased and teased and it looked alright. But then I brushed the front to make it go into a bun and it got rid of most of the teasing so I would just skip the teasing in the front.

Actually once the bun was up, I think it looks the same as non-teasing bun on my head.   I lost most volume. I couldn't really change the height or width of it.

My hair is long but not that long so tons of hair fell down from the back with a ponytail so high on my head. (Refer to first picture at the top of this post.)

I needed a ton of bobby-pins because my hair has no texture like it has when it is permed and so each grouping of hair needed to be pinned. It was not staying put on it's own at all. It was not sticking to other hair.

I didn't use hairspray because this was just a test run before I actually wear this all day or leave the house with my hair like this.

I don't really ever like my hair up. I have too many little hairs all around my head so I don't know if I'll actually ever do this or not.

It looks much better on Sydney so everyone else should try it.


Side note: under my eyes looks super wrinkled like I'm old.  I guess that's what 10 hours of sleep does to you.

Wednesday, November 10, 2010

Photoshop Tutorial/Actions from others

Sydney posted a tutorial of what she does in Photoshop to her photos.  Then Kirsten posted a comment on her blog about making that into an action so it's only one click on every photo after that.  I thought I heard this "action" term before and never knew what anyone meant so then I emailed Kristen and she shared her steps with me to make it an action.

Here's what I did with the new magic I learned.
Before and After
 I created the action using Sydney's instructions and Kirsten's instructions.
Before and After (with cropped after)
 Then I tested it on a 2nd image to see if I made the action correctly.
Before and After
Then I double checked it again on a third image. You  never can be too careful you know.

Now I did screw up and opening the image was part of my action. Ooops.
Here is how you create an action (compliments of Kirsten)

1. Opened Actions palette (if yours isn't already open, go to Windows then click Actions).
2. Click that little icon in the top right of the palette that has some horizontal lines and a drop down arrow. Then click New Set.
3. Title the set whatever you want - this will be the folder that the action is stored in. You can create multiple actions and keep it in the same set (for ex, you can make variations of Sydney's tutorial with other layer fills)
4. Click that drop down again, and select New Action. Pick the set you  want to put it in from the drop down, and click Record. Any editing that you do to the photo will now be recorded in the action.
5. Once you are done editing the photo and want to stop recording the action, press the square "stop" icon at the bottom of the actions palette.
6. Open another image and test the action. You do this by selecting the ACTION (not the set), and pressing that triangular "play" button.  If you made a mistake, just click that drop down menu in the top right corner of the palette again and hit "record again." That should help you work out the kinks, and just test test test until you get it right!
Update: Please make sure you save your action.  How you went to New Set and New Action, click on the little icon with the lines and go to Save Actions.  Next time you open Photoshop if the actions are not automatically loaded then go to Load Actions. My actions disappeared. I've talked to Kirsten and she said hers stay in Photoshop each time. I would click save just to be sure.

Now that I know what an action is, I can find free ones online to use and play with.  I already did a little.  The purse pictures I posted earlier used a few actions from The Pioneer Woman.

What do you normally do to edit your photos?  I don't normally do anything but I want the option to do something fun.
Do you have any actions that you use?  Do you know of any good sites to get some free downloadable actions? 


I did one of a day I took my picture inside. It didn't turn out so well. If I'm wearing very dark colors or too much black it's not so good.   Here is one example that is alright though.
I even tried it on a picture of Poly.

Tuesday, October 19, 2010

Quick Photoshop Tutorial

Lately I've been emphasizing what color it what in my color rotation.  I am going to explain how I do it.  It is much easier than how I used to do it so I thought I would share.

I am using CS4 here.
Step 1: Open Image
Step 2: Select the Magic Wand Tool
Step 3: Click on something that you want to select (Orange shirt in this picture)
Set the Tolerance to 70 or so at first.  Hold Shift and click another area.  The shirt has a few shadows so it does not all pick up at one time.
Adjust the Tolerance to 20 (or so) and click on the last few details along the edges.  Remember to hold shift.  You can backup at any time also if you select something and it actually selects a much larger area.   I always leave Contiguous checked for a solid shirt. If the shirt is striped, I uncheck that.

Now everything should be elected that you want to remain a color.
Step 4: Select>Inverse (Or Shift+Ctrl+I)
Step 5: Image>Adjustments>Desaturate  (Or Shift+Ctrl+U)
There you have it!
That's all there is to it.  

I used to use layers to create partial color and partial black and white.  This would have saved me tons of time.  I edited a ton of my wedding pictures. Now I want to go back and edit more with this quick way of doing things. 

If you want to adjust the color a little you go to Select>Inverse and then go to Image>Adjustments>Hue/Saturation and play around.
What do you think? Can you do it?


I have a few more tutorials up my sleeves but I'm not sure if they are good enough or not.

Wednesday, September 15, 2010

Greeting Card Box Tutorial

A little over a year ago, I wanted a box that could store 5 1/2 x 4 1/4" greeting cards. I searched and searched. I found a ton of blogs that made boxes for 3x3 but that wouldn't do.  So then I decided to make my own.

I have been wanting to redo the format of it to just post it here, but that has seemed like too much work, so I'm just going to link to the pdf.